Zebra Printer Setup and Config
ProfitSystem® will allow you to use a variety of printers for your garment tags, pick-up tags, and mailing labels. We recommend using dedicated tag/label printers such as Zebra. These dedicated printers are designed to easily print one tag/label or a hundred tag/labels at a time.
The standard tags/labels come configured to print using a Zebra tag printer. Here are some of the standard sizes.
- H = Height, W = Width
- 1”H X 3”W self-adhesive accessory label
- 2”H X 4”W tag for garment tags and labels, in pink, blue, or white
- 3”H X 4.25”W self-adhesive pickup label
- .5'H X 2.2'W self-adhesive bell shaped jewelry label
- 1'H X 2'W 4 up (divided into four .5'H X 1'W labels) self-adhesive accessory label
If you want to edit the standard tags/labels, or use non-standard tags or labels you must configure the Windows print driver for your tag/label printer for the exact size of the tag/label you wish to print. See Print configurations within Letters, Tags, Labels.
Set up a printer
- First, connect the printer to a PC and set it up in Windows so it can print a test page.
- Install the Printer Server software on the PC or Mac using the following links:
Windows: https://bblsystems.com/downloads/everywhereprintsetup.exe
Mac: https://bblsystems.com/downloads/EverywhereRetailPrintServer.pkg - Open the printer software web page on the PC or Mac using the fllowing URL https://printserver.bblsystems.com:29562/
- In ProfitSytem, click the Add button and give the printer a name such as Shipping or Receiving
- Once the printer is added, the program will display the config file for the print server and copy it to the clipboard.
- On the printer web page, select Menu->Edit Config
- Paste the config file into the "Edit Config" window and click Save
- On the printer web page, select Menu->Shutdown Print Server
- Finally, restart the print server from the Windows Start menu or Mac Apps
Troubleshooting
Use nslookup printserver.bblsystems.com to check the IP address returned. It should be 127.0.0.1. If you get an error, then you can add it to the hosts file.
Add to HOSTS on Windows
- Click Start and type notepad but don't start it
- Right-click on Notepad and choose "Run as Administrator"
- In notepad, open "c:\windows\system32\drivers\etc\hosts."
- Add a line at the end:
- 127.0.0.1 printserver.bblsystems.com
Add to HOSTS on Mac
- Type sudo nano /etc/hosts and press Return
- Enter your admin password
- Add a line at the end:
- 127.0.0.1[tabkey]printserver.bblsystems.com
- Type Ctrl-O to save
- Type Ctrl-X to exit
Zebra Models
LP2844
Last Order Date - September 30, 2012
End of Service Date - October 31, 2015
Replacement - GC420
GC420
Last Order Date - January 31, 2020
End of Service Date - March 31, 2023
Replacement - ZD220, ZD230, or ZD420
GK420
Last Order Date - June 29, 2018
End of Service Date - October 1,
Replacement - ZD420
ZD220 Current Zebra printer model as of January 1, 2020
Bar-code Readers
Most tag/labels print a bar-code which utilize bar-code reader equipment. Readers manufacturers use different technologies to read & interpret bar-codes. As a result, a reader from a manufacturer may read a specific bar-code, but a read from another manufacturer scanner may not. The good news is that ProfitSystem offers flexibility in how a bar-code prints out, i.e. density and size. As a result, the reader purchased by a store must be tested against the tags being printed to insure the reader can read the bar-code. If it can't, the tag/label bar-code format must be edited and reprinted, then re-tested until the reader can read the bar-code reliability.
Zebra Printer Commands
ZD420D Calibration 1. Press the power button and wait for the solid green status indicator light. 2. Hold the pause and cancel buttons down for 2 seconds and let go. The printer will measure and feed a few blank labels.
ZD620D Calibration 1. Press the power button and wait for the solid green status indicator light. 2. Hold the pause (II) and cancel (X) buttons down for 2 seconds and let go. The printer will measure and feed a few blank labels.
GC420D, GX420D Calibration
With the printer power on and top cover closed, press and hold the Feed button for several seconds. The green status LED will flash a number of times in sequence. The sequence starts at 1 flash and progresses up to 7 flashes. Release the key after the specific number of flashes and before the next flash sequence starts to perform a task. Status Light flash sequence for auto calibration
(flash once, pause)
(flash twice) Release the feed button Releasing the feed button after the flash twice sequence will cause the printer to measure and feed a few blank labels.
Zebra Printer Sensor Calibration
- First, install the Zebra Setup Utilities for Windows on the PC where the printer is installed. As of August 2020, the download link is: https://www.zebra.com/us/en/support-downloads/printer-software/printer-setup-utilities.html
- Make sure the bell tags are loaded in the printer.
- Run the Zebra Setup Utilities as Administrator and select the Zebra printer.
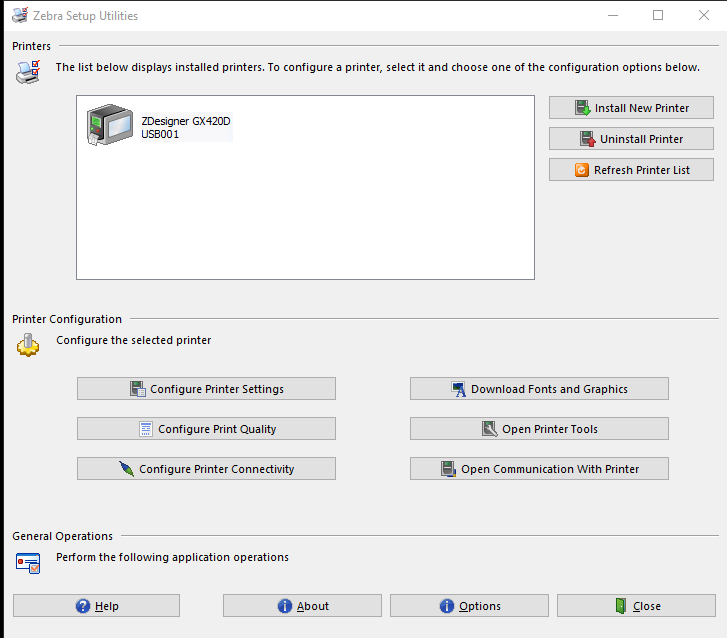
- Click on the printer, then click Open Communication with Printer. In the top window, paste ^XA^HH^XZ and click Send To Printer. This will display the printer status in the bottom window. This confirms the printer is working and online.
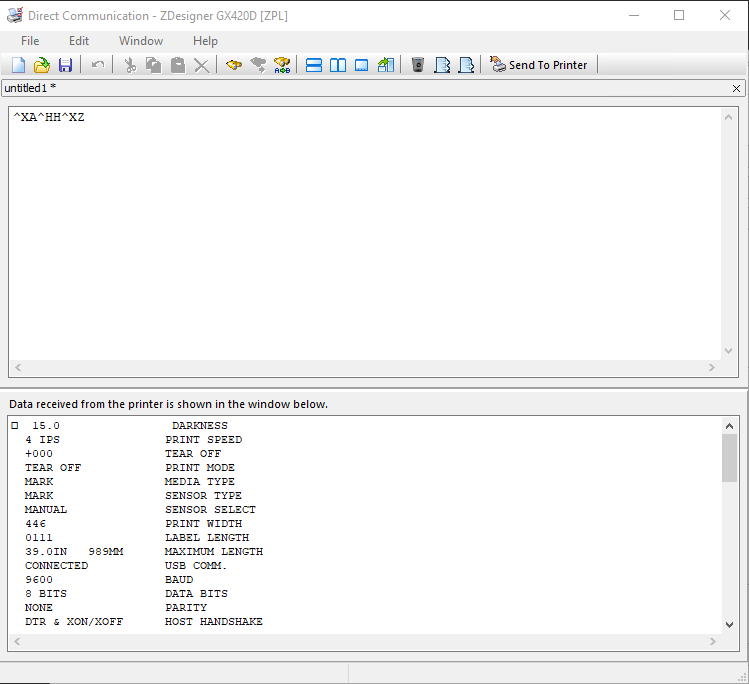
- Click Clear Received Data icon in the toolbar. In the top window, paste ^XA^MNM^JSR^JUS^XZ and click Send To Printer. This will set the printer to Mark Sense. There should be no reply.
- Click Clear Received Data icon in the toolbar. In the top window, paste ~JG and click Send To Printer. This will perform the sensor profile procedure. This will use 2 or 3 feet of bell tags.
- Click Clear Received Data icon in the toolbar. In the top window, paste
^XA^HH^XZ
and click Send To Printer. This will display the printer status in the bottom window. The sensor type should be MARK. Also, look for LABEL LENGTH. It should be the (printer Dots Per Inch * label length) . For example, the GC420D has a DPI of 203. The label length is .5 inch. So the number should be around 0111, since (203 * 0.5) = approx 111.
If it's way off, then the procedure did not work. We can factory reset the printer and try again. Close the communications window. Click Open Printer Tools. Go the Action tab. Click load factory defaults. Click Send. Once the printer finishes, reboot the PC and cycle the printer power. Try from step 3 again.
If the procedure worked, try printing a few bell tags in a row and make sure it always returns the the start of a new tag. If the printing is consistent, but the tags are too low or high, that can be adjusted. If you edit a PRN file with Notepad, you'll see something similar to the following. The ^LT0 is the adjustment number. Negative numbers move the entire tag up. Positive move it down. The number represents the Dots, so if a printer is 203 Dots Per Inch, that means -33 would move it up by about (33/203=.16 inches)
^LT-33 = UP .16 inches ^LT100 = DOWN .5 inches
CT~~CD,~CC^~CT~
^XA~TA000~JSN^LT0^MNW^MTD^PON^PMN^LH0,0^JMA^PR6,6~SD15^JUS^LRN^CI0^XZ
^XA
^MMT
^PW446
^LL0102
^LS0
^FT316,71^A0N,16,28^FH\^FD%%alltrim(sivendno)%%^FS
^FT317,49^A0N,16,28^FH\^FD%%alltrim(SSSTYLECODE)%%^FS
^FT316,29^A0N,20,33^FH\^FD%%ssmkdnretl1%%^FS
^BY2,2,30^FT24,50^B2N,,Y,N
^FD123456789045^FS
^PQ1,0,1,Y^XZ
Zebra Printer Network Setup
- First, install the Zebra Setup Utilities for Windows on the PC where the printer is installed. As of August 2020, the download link is: https://www.zebra.com/us/en/support-downloads/printer-software/printer-setup-utilities.html
- Connect the printer to the computer using a USB cable AND the Ethernet cable.
- Run the Zebra Setup Utilities as Administrator and select the Zebra printer.
- Choose Configure Printer Connectivity
- Choose Wired, and Next.
- Choose Internal Printer Server, and Next.
- Choose Static and enter a hostname such as ZD420D, and a static IP address, subnet mask, and default gateway that will work for your local network. The static IP should be something like 192.168.xxx.xxx or 10.xxx.xxx.xxx. You need to be sure the IP address you assign will not be used by the DHCP server on your local network. Typically, your internet router has your DHCP and assigns IP addresses to devices on your network.
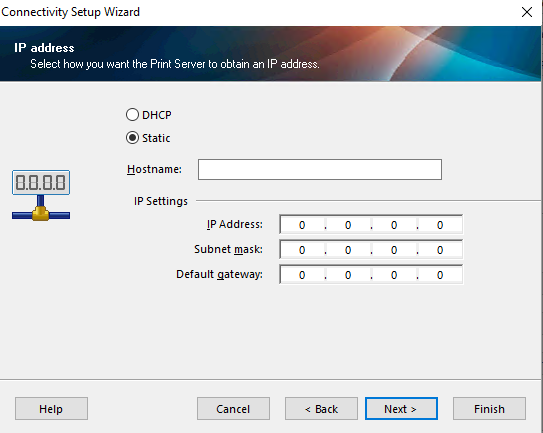
- Click Next and Finish.
- Cycle the power on your Zebra printer.
- On the Zebra Setup Utilities, select your printer and choose Install New Printer. Follow the prompts to install the driver for your specific model of Zebra. If it asks for the IP Address, use the one specified above.
The procedure is also documented here. Scroll down to the Wired section.
The procedure to print the current IP of the printer is documented here. https://supportcommunity.zebra.com/s/article/000018181?language=en_US