Prospect Appointment Request Cloud Form
Overview
Prospect/Appointment Request in the marketing module lets prospects send you their contact details via a web form on a web page, and those details will be automatically added to the prospect file in the Profit System. The prospect can also request an appointment via the web page and the Profit System will guide you through creating an appointment for the prospect.
The web page that the prospect fills out is hosted on the your shop's web site. It can be styled via cascading style sheets -CSS by a web deesigner to match the style of the shop's existing web site. When the prospect fills out the form and clicks Submit, the prospect's details are saved on BBL Systems data warehouse server where they wait for the store to retrieve.
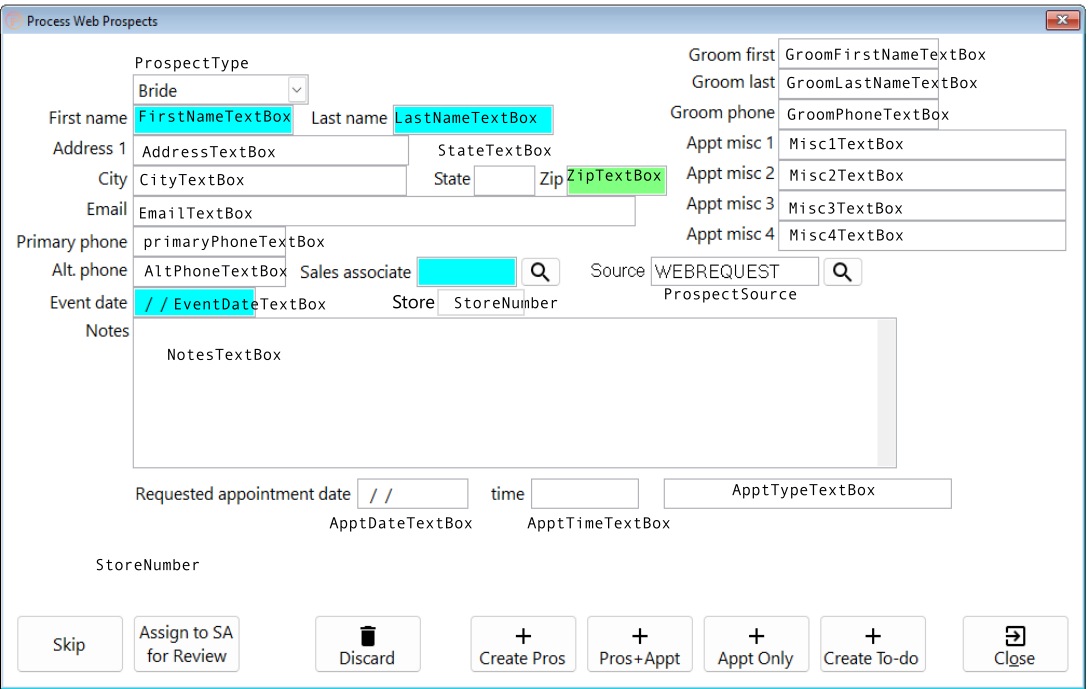
To process data from web forms go to the Process Web Forms / eMail on the Marketing switchboard. This ProfitSystem form shows the new web data for each web form to the user. The user reviews the data details and decides if it’s a valid prospect. If so, they click Create Prospect or TO DO or Prospect + Appointment. When the data is SPAM click Discard. Then the next prospect is shown and the process is repeated.
The prospect source is automatically set to WEBREQUEST. This allows the Prospect Listing report to be run for prospect source WEBREQUEST, and can be filtered to today, which will show all the new prospects.
Step by step
- Create a default Prospect.html file containing the HTML code for the web form. See "Create a default form" below
- Add the web form to you web site. You can upload the prospect.html form directly to your web site and it will work. However, it is not styled to match your web site. You may also be able to create a web form using your web site software, such as Wordpress. The web form should contain the same fields as the default prospect.html created above, and should post to http://services.bblsystems.com/ProspectPost.aspx
- Fill out the web form and submit it.
- In ProfitSystem, go to Reports->Marketing->Process Cloud forms and confirm the data you entered on the web forms appears.
Create a default form
To generate a default form, start the Profit System and go to Marketing->Create Cloud Forms (or Main Menu->Reports->Marketing->Create Cloud Forms).
The encrypted shop id and store number are shown at the top of the form. Click Prospect/Appoint Page. The Profit System will prompt for a folder, and it will create prospect.html file. This file can be used as is, or as a starting point for the web form. The page will already have the correct encrypted shop id and store number embedded, along with basic formatting.
Certain fields must be present with specific names, and the form must post to: https://services.bblsystems.com/ProspectPost.aspx
Testing
After submitting a form, go to http://services.bblsystems.com/Testform.aspx?shopid=MjA5MjY= replacing MjA5MjY= with your encrypted shop id.
The resulting page will show you the values from the last form submitted.
Additional forms may be created using the same methods utilized in the prospect.html form. Example forms could be Appointment Request, More Info, Contact us, etc. The form data collected will be inserted into the ProfitSystem prospect table and used to create appointments when the form contains data within the ApptDateTextBox text box of the form. As form data results are pulled from the BBL data warehouse via the Get form / eMail results menu, the user will be able to make import decisions.
Fields
These forms fields will save to the ProfitSystem prospect database mapped to the fields indicated below.
ProspectType...Value can be either Bride or Groom. If the ProspectType data field is missing, the system will default to Bride. This field data controls whether the details as name, address, email & phones go into the Groom or Bride fields on the prospect form.
FirstNameTextBox...Bride or Groom First name, should be required on web form.
LastNameTextBox...Bride or Groom Last name, should be required on web form.
EmailTextBox...Bride or Groom Email, should be required on web form.
EventDateTextBox...ProfitSystem->Event date, should be set as required. Should be formatted as the common date format for the region (MM/DD/YYYY for the USA), or as YYYY-MM-DD
AddressTextBox...Bride or Groom Address
CityTextBox...Bride or Groom City
StateTextBox...Bride or Groom State
ZipTextBox...Bride or Groom Zip
PrimaryPhoneTextBox...Bride or Groom Primary phone. Should be Cell phone, format as 770-555-1212, should be required on web form.
AltPhoneTextBox...Bride or Groom Alt phone
NotesTextBox...ProfitSystem->Notes. Can be any free form text
ApptDateTextBox...Displayed to the ProfitSystem user on import and if filled in will be prompted to create an appointment. Should be formatted as the common date format for the region (MM/DD/YYYY for the US for example), or as YYYY-MM-DD. Data is not saved in ProfitSystem. Store user on form import will see requested Appointment Date & Time, then will select an open Appointment Date & Time based upon the user's request.
ApptTimeTextBox...Optional for the appointment. Displayed to the ProfitSystem user on import if present. Data not saved in ProfitSystem. Time will become the actual appointment created by the user.
ApptTypeTextBox...Optional for the appointment. Displayed to the ProfitSystem user on import if present. The appointment create form will use this type as the default whe the user goes to create an appointment.
storenumber...A required hidden text field. The store number for the Profit System, usually 01 for single store systems. For multi-store, the actual store ID that should be assigned to the prospect on import. To get your store number, start the Profit System and go to Main->Reports->Marketing->Setup MyInfo/Forms. The store number is shown at the top of the form
Shopid...A required hidden text field. Encrypted shop number. This must be present for the BBL Systems data warehouse to send the form details to the correct bridal shop. Example MjA5MjY= Note that you should not use this value, it’s an example to show you what your shopid will look like. To get your encrypted shop id, start the Profit System and go to Main->Reports->Marketing->Setup MyInfo/Forms. The encrypted shop id is shown at the top of the form
ProspectSource...The prospect source, corresponds to the source text field on the PROSPECT form. If left blank, it will be set to WEBREQUEST.
Confirmpage...A required hidden text field. The URL of the web page that should be shown after the user clicks Submit. It defaults to http://services.bblsystems.com/FormComplete.htm which is a generic “Thank you” page.
GroomFirstNameTextBox...The grooms first name. Should only be used if the prospect type is set to Bride, and FirstNameTextBox holds the brides name.
GroomLastNameTextBox...The grooms first name. Should only be used if the prospect type is set to Bride, and LastNameTextBox holds the bride.
GroomPhoneTextBox... The grooms phone. Should only be used if the prospect type is set to Bride, and PhoneTextBox holds the bride.
Misc1TextBox...A misc field on the appointment. Data entered here is stored on the prospect and inserted into the misc 1 field of the appointment.
Misc2TextBox...A misc field on the appointment. Data entered here is stored on the prospect and inserted into the misc 2 field of the appointment.
Misc3TextBox...A misc field on the appointment. Data entered here is stored on the prospect and inserted into the misc 3 field of the appointment.
Misc4TextBox...A misc field on the appointment. Data entered here is stored on the prospect and inserted into the misc 4 field of the appointment.
More fields can be added to the web form. These new fields are simply saved to the prospect notes field when the prospect is imported.
When processing cloud forms into ProfitSyste, the fields on the web form are mapped as shown here. When you create an appointment and/or prospect from the form.