Customer Form Customer Tab
Action: CUSTOMER
The Customer tab contains personal data about the selected customer.
Scan Drivers License...The ProfitSystem can auto-fill some customer details from a drivers license. Drivers licenses in North America contain a 2D bar code on that back that encodes the customer name, address, birth date, and other details.
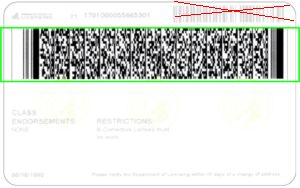
To scan the 2D barcode on a drivers license, you need a 2D scanner. If a 2D scanner is connected, you can press this Scan Drivers License, then scan the 2D barcode, and it will fill in many of the customers details automatically.
We have tested using the Wasp WWS650 2d scanner, and also the Zebra Symbol DS2208-SR. The Wasp is wireless and comes with a stand for hands free scanning. The Zebra one is corded via USB, and it is available with an optional stand for scanning at point of sale. Please reach out to sales to purchase a compatible scanner.
Customer...This the unique customer ID automatically generated by ProfitSystem®. The first part of the number is your store number (as set in Main->Housekeeping->General Setup->System/Store Setup->Setup Tab) followed by a sequence number. You cannot change this number.
Name, Salutation, Birth date, Address...This is the demographic information for the customer. As you are entering the contact information, enter the zip code before you enter the city and state. If ProfitSystem® has the zip code on file, it will fill in the city and state for you. As you enter zip codes, ProfitSystem® will learn which zip codes are associated with which cities and states. You can view/modify the zip code ProfitSystem® has learned on the Zip Code form (at Main->Housekeeping->General Setup->Zip Codes (ZIP))
Store...The store that created this customer. Normally, this is your store unless you are using the Multi-Store Integration.
Contact phone numbers. (Primary, Alternate, Work, Fax, pager).. The primary number is usually their mobile phone number. The primary number is utilized by ProfitSystem to compare when adding new customer entries to help prevent duplicate customer entries.
SMS Alerts?...If a mobile phone carrier is selected, ProfitSystem® will be able to send SMS messages to this customer. SMS messages will be sent to their primary phone number.
Customer source...The customer source represents an activity (advertising) (i.e., yellow pages, word of mouth, etc.) that caused the customer to visit your shop. By using this code, you will be able to generate analysis reports that will provide information indicating your most powerful form of advertising. You can define your sources using Main->Housekeeping->General Setup->Customer Sources. These same sources are also used with Prospects.
Customer type...The type code is used to identify different groups of customers. You can analyze your customers by type, and print letters, mailing labels, etc. You can define the types you need using Main->Housekeeping->General Setup->Customer Types.
Alternate ID 1-4...These four fields are provided for you to enter any information you need. You can change the captions for these fields in Main->Housekeeping->General Setup->System/Store Setup->Setup Tab.
Female/Male...This is used to display the correct measurements on the Details tab, and the Members Tab of the Event form. You can also use this field in queries to analyze your customers.
Show notes on new order? checkbox...WinTPOS optional module feature. Checked this will display the customer notes when a new rental order is created for this customer.
Tickets list...This list shows you all the Tickets for this customer. You can double-click on a ticket in the list and ProfitSystem® will show you the ticket itself. You could then sell an item on that ticket, take a payment, make a refund, etc. The list is sorted in reverse chronological order (most recent first) The date in the list is the date the ticket was created, not the event date.
Orders list... WinTPOS optional module feature. This list shows you all the Orders for this customer. You can double-click on a order in the list and ProfitSystem® will show you the ticket itself. You could then sell an item on that ticket, take a payment, make a refund, etc. The list is sorted in reverse chronological order (most recent first) The date in the list is the date the ticket was created, not the event date.
Email address... The email address for the customer. You can send an email by double-clicking on the email address. If nothing happens when you double-click on the email address you need to configure Windows with for default email client. Consult your Windows documentation for more details.
Un-sub from marketing...Stops the customer from receiving emails sent via the Marketing form. The customer will still receive all other emails from the ProfitSystem.
Buttons
Notes button...Enter any general notes about the customer.
Show events button...Displays a list of the all the events that this customer is in. Remember, there is only one customer record, even if the customer is in multiple events.
New ticket button...Creates a new ticket for this customer. You would use this if the customer is making a brand new purchase is not related to an event. If they are purchasing something related to an event, you should ring up the sale through the Members tab of the Events form (at Main->View/Change Event->Members Tab) If you do use the New Sale button here, and the customer is in any events, ProfitSystem® will still ask you if this purchase is for any of those events, just to be sure.
Camera button...You can take pictures of customers and store them on the customer card. This button displays the Images form, where you can take these pictures, view them, and delete them if you need to.
Find Style button...Only available on the Walk-In customer. This option is used to locate the ticket that contains a specific style code. You will first be prompted for the style code to search for, then ProfitSystem® will display all the tickets that contain that style code. his is usually used to ring up a return for an item sold using the Quick Sale.
Appointments button...Displays the Appointments form, only showing appointments for this customer. On the Appointments form ProfitSystem® will indicate the the list is being limited to appointments for this customer by showing “Limit to customer” in the Limit criteria box.
Fittings button...Displays the Fittings form, only showing fittings for the current customer.
Orders list...This list shows you all the rental order on file for this customer. You can double-click on an order in the list and ProfitSystem® will show you the rental order itself.
Order functions button...This button displays a menu of order WinTPOS optional module functions, which are:
View Order: Displays the rental order currently highlighted in the orders list.
New Order: Creates a new rental order for the customer.
Pickup: When the customer arrives to take the rental order, use the Pickup button to mark the selected order taken by the customer. If the rental order has a balance due the payment form will be displayed to collect the payment due. You can also pickup a rental order by using the Pickup button on the main switchboard. It is important to pickup the rental orders so WinTPS can track order status accurately, and report on delinquent orders and also compute late fees correctly.
Return: Click this button to return the highlighted rental order. You can also return an order via the Return form from the main switchboard. Again, it is important process Pickups and Returns via WinTPS so the statuses in WinTPS will be accurate.
Plant Status: Only available if you have the WinTPS Link Integration, and if the Communications Method is set to Realtime. Clicking this button will display the order status in TPS Plant. After the order is confirmed in WinTPS, it will pass through a variety of statuses in TPS Plant (WT ASM, IN ASM, WT SHP, SHIP) During this time, the status is WinTPS will remain Confirmed. In this case, knowing the TPS Plant status can be useful.
Cancel: Exit menu & return to previous form.